Monday, July 27, 2015

Walking stick complete

So here's a few photos of the completed walking stick. I'm happy with how it turned out. And it justified purchasing a drawknife, so that's a win-win!


Progress on Four-legged Three-legged Stool

After much more time and energy than I care to admit, I'm making good progress on the two cherry stools. These are my four-legged version of the Tage Frid three-legged stool design. I'm working on milling wood for all the parts (which is challenging because the humidity is making them move all over the place), but the biggest achievement so far is the progress I've made with the seat connector piece. This little 4" by 5" chunk does the work of keeping the whole stool together. (By the way, when does a stool become a chair? This is going to have four legs, so maybe it deserves chair status.)


This piece joins the front part of the seat to the seat back but also connects to the back legs. That's more action per square inch than any other part of the chair. So here's the rundown on what I've done to the connector so far:

Made a blank out of plywood (3/16" thick pieces of cherry laminated in perpendicular layers)
Straightened it up and cut it down to size
Cut a 4" wide tenon to fit the mortise in the front of the seat
Cut a 75 degree angle on the back

Next up:
Cutting angled dovetails to join the seat back
Cutting an angle on the underside to join the seat
Cutting 13 degree bevels on both sides
Cutting slots to fit dovetails on the two back legs

This is a lot of stuff, especially since two of the upcoming tasks require making jigs that work just fine in my head but haven't been attempted in the real world. And after all this, I have to make the rest of the stools (I mean chairs).


Friday, July 10, 2015

Walking Stick

A client approached me recently about making a walking stick from a piece of wood she and her husband picked up on a hike. I thought, how difficult could it be to take a large piece of wood and make it into a smaller piece of wood?


When I saw the wood at first, I didn’t recognize the species. I thought it could be anything from ash to oak to cherry to walnut. I got out my new hatchet and started removing the bark. When I got down to the heartwood, I realized the species was hickory. It felt like I was trying to cut marble.


I fretted about how I was going to remove enough wood to make this stick functional and attractive, considering using a chainsaw or a grinder. But I realized it was kind of fun hacking away at it with the hatchet, so I kept going. I’m new to using a hatchet, so this was the perfect way for me to learn about its capabilities and how to use it. I found that the hatchet was great for doing a kind of hewing. I would chop perpendicular to the grain in a long row, then go back through with glancing chops to remove the wood. It worked really well and removed material much faster than I imagined.


After taking the piece down to a thickness of 2” or so, I used a drawknife to refine the shape a bit more. I don’t have a shaving horse, so it was a challenge to secure the wood. I managed to lean it against the house or hold it down with my foot at an angle against a chair. It wasn’t pretty, but I made progress.

With the wood down to the approximate thickness I was going for and basically round, I used a spokeshave to do more refining. I love using a spokeshave. It’s an incredibly versatile tool that I am incorporating more and more into my work.

The stick is quite rustic on purpose. There are some knots here and there, some worm channels and even holes that go straight through. I chopped off the bottom and the top, drilled a hole for a strap and sanded it. The hickory is amazingly strong. This stick will outlast anyone who owns it. Once I apply a few coats of finish -- I’m using boiled linseed oil, polyurethane and some mineral spirits. I’ll post a photo once the finish is on, but for now, here it is.

x

Monday, June 8, 2015

Engineering solution?

To get around the issue of the grain running in the wrong direction on the connector of my modified Tage Frid-style stool, my idea is to make the connector piece essentially out of hardwood plywood. I created the plywood with ¼” thick plies of cherry in an alternating perpendicular orientation. This way, potentially, the wood on the sides of the connector piece will have a substantial amount of end grain to connect to.


I made the plywood, cleaned it up a bit on the jointer and planer, and cut the sides with a 15 degree bevel. This bevel establishes the splay angle of the legs. To complicate matters, the leg will also be joined at another angle that will establish the rake, making this a compound angle dovetail. (The splay angle is side to side; the rake is front to back). I used the test leg I cut for my first test since it already had the tenon that will form the vertical tail of the dovetail. The trick to cutting angled dovetails is to not think about the fact that they are angled dovetails. Just mark everything clearly and cut to the lines.


I was a little nervous when I tapped the dovetail together because this is where it broke in my last test. The fit was a bit too tight and I had to do more pounding than tapping to put it together. The joint survived the pounding without a budge. Now that it was together, I had to try to break the wood. I wrenched it around, simulating the wracking force chair legs have to endure. Nothing moved; no cracks anywhere. I put the leg securely in my vise and got out my hammer. I bashed it in all directions and still it didn’t move. Finally, I climbed up on the bench and put all my body weight on the joint. There was a bit of creaking, but I think that was me and not the wood.


I’m satisfied now that this plywood method will hold. Not only does it provide end grain for the dovetail but each layer bolsters the other layers against movement. I’m considering adding another ply of cherry going side to side on the underside just between the two leg joints and adding a small stretcher a few inches down from the seat, which will serve two purposes -- fortifying the two legs and serving as a handle to move the stool. Also, I feel like the tenon can be a touch wider, so i’ll incorporate that as well. All in all, I’m happy enough to go forward.

Wednesday, June 3, 2015

Engineering Problem

I love a good engineering problem. I think my favorite thing about woodworking is that it’s the intersection of engineering and creativity. I’m working on a design for some barstools based on the Tage Frid three-legged stool. The problem is that the seat height needs to be about 28” and I’m afraid sitting on a three-legged stool that high would make it top heavy. The last thing I’d ever want is someone falling off of one of these stools. Frid swore by the design of the third leg in the back. I’ve made a couple of those stools now, and I agree that it’s fine when you are sitting at a low height. People aren’t used to having one leg in the back, so when they shift around expecting the seat to be solid, they could topple over.


The second problem is that I’ve seen examples of people making the Tage Frid stool with slight variations and they never look right. The proportions are critical to this design. They make the design. So how do I add another leg in the back without messing with the proportions? I did drawings where I widened the connector between the seat and back to accommodate two legs joined with through tenons. They looked awful. I found that no matter how great the rest of the stool looked, my eye always went right to the connector, which called attention to itself because it was so out of proportion to the rest of the stool. My proposed solution is to join the legs on the sides of the connectors with vertical dovetails.


So. The other problem is the grain direction of the connector. The grain needs to run straight from the dovetails on the back to the tenon on the front. If you make a hole on the side, you leave a section of short grain which is vulnerable to breaking. Indeed, on my first test run, the back chunk of the connector broke immediately. This is a critical area of the stool, so that part of the connector needs to be strong.

My idea for mounting the legs in that spot with a dovetail is to make the connector out of laminated perpendicular plies. It would be like plywood, except this would be hardwood plywood. This is a compromise, as most design decisions are. My hope is that the plies will adhere well and strengthen each other. Time to do some tests.


Friday, November 21, 2014

Tage Frid Three-legged Stool

I just finished a series of posts on the Craftsy woodworking blog about building a Tage Frid inspired three-legged stool. It was a challenging build from start to finish. These posts detail the whole process. My version is made of Ambrosia maple.


Craftsy posts:

Wednesday, September 10, 2014

Robotic Furniture

This article introduces the Roombot, a robot that assembles itself into different pieces of furniture -- Transformers-style. The inventors describe it as the "future of furniture." Why am I not worried?


Thursday, August 21, 2014

Libby Schrum in the New York Times

I’m happy to report that friend-of-Furnitude Libby Schrum got a great feature on her bench 'Siblings' in the Home and Garden section of today's New York Times.  Nice ink, Libby!  See my post on her work here.


Tuesday, July 29, 2014

Craftsy Post on Spoonmaking

Here’s my new Craftsy post about my first foray into making a wooden spoon. I’m not sure it was wise to write a post about my first effort but I tried to illustrate my learning process. Spoonmaking seems to be huge right now. Here's a link to the #spoonmaking tag on Instagram. Crazy! I'll do a post on spoonmakers soon. I love that people are making all kinds of stuff. 


Saturday, July 26, 2014

Jeff Miller Chairmaking Class

Jeff Miller, one of the great furniture makers working today, is teaching a class in Nashville soon for the Cumberland Furniture Guild. If you are in the area, there are still a couple places left in the class. Click here to register. The class will be on August 9 in Spring Hill, Tn.

Jeff is as good a designer as he is a maker, so I’m happy to be able to take the class from him myself. I'm eager to hear his thoughts on approaching chair design. Here is Jeff’s website. And here is a post I wrote about him back in 2008. His arch table is still one of my favorites.

Here is a video about Jeff from the Highland Woodworker. Enjoy.


Monday, July 21, 2014

Woodworking in Space


In the future, when we colonize Mars, will we bring with us every possible thing we could ever need or will we make stuff we need? 

I should probably read up on the force of gravity on Mars, because gravity is why we make most furniture. We need something to hold us and our stuff off the ground. (OK, a short Google search later, and I found that gravity on Mars is only 38 percent of the gravity on Earth. For comparison’s sake, the Moon’s gravity is 83.3 percent LESS than Earth’s.*) So instead of making furniture to hold us up, we might need to make furniture to hold us down. We might store things on the underside of shelves so they won’t wander off.

"Lignin or lignen is a complex polymer of aromatic alcohols known as monolignols." -- Wikipedia


It’s possible that we will be able to mine Mars for materials (we’re good at figuring out how to make that happen). But there are no trees on Mars. NASA (or, more likely, SpaceX), should create some kind of polymer extrusion machine. You’d feed in raw elements like carbon and oxygen and whatever else makes up lignin, and then extrude it into various shapes. We could carry up hand tools to shape and join this wood-like substance into furniture and shelves and other stuff. We could also re-purpose some of the original stuff we brought with us, forming a Mars maker movement. 

All of this leads to one bold but logical conclusion:  woodworkers should be the first people on Mars.


* Update: An alert reader (I'm surprised I have any readers, much less alert ones!) schooled me on the gravity percentages above. Turns out the moon's gravity isn't 83% of Earth's but 83% LESS than Earth's. So I took out my Buzz Aldrin sight gag... Got to get your science right.

Friday, June 27, 2014

Craftsy Posts about a Jig for Miters and Bevels

Here are parts one and two of my Craftsy article describing how to make this new miter/bevel jig and how I use it to make boxes.

Not too shabby. This isn't even glued up yet:


The jig in all its simple glory:


I sometimes post in-progress shots on my new account at Instagram. Check me out there: http://instagram.com/furnidude.

Tuesday, June 24, 2014

Furniture I Love: Chairs by Alan Daigre and Matthew Teague

One of the great things about belonging to a woodworking guild (shameless plug for the Cumberland Furniture Guild) is that you get to meet amazing woodworkers who live nearby. That’s especially true for Matthew Teague and Alan Daigre. Both are great woodworkers in their own right, and they’ve been collaborating for the last few years on making incredible chairs. Check out this chaise made by Alan Daigre. I saw it from a distance once and could have sworn it was green velvet.


It’s kind of shocking how comfortable these chairs are. You’d swear you were sitting on upholstery. Be sure to check out the page that lists the galleries and shows where their work is available so you could try one out yourself. This one is a collaboration between Alan and Matthew.


Here's one of Alan’s signature rockers.


Alan’s Facebook page is here. Matthew has also started Spring House Press, a new publishing venture for the maker movement. He’s got some very cool titles out and more coming soon. Enjoy!

All photos by Dan Feather

Friday, June 20, 2014

Craftsy Post: Shaker Woodworking

Here is my take on some of the characteristics that define the Shaker style:

http://www.craftsy.com/blog/2014/06/shaker-woodworking/


Wednesday, June 11, 2014

Craftsy Post: Achieve Worry-Free Furniture Glue-Ups Every Time With These Helpful Tips

Have a look at this other Craftsy post on how to successfully glue up furniture without making yourself crazy: http://www.craftsy.com/blog/2014/05/how-to-glue-up-wood/


Craftsy Post: Making a Tage Frid-Style Three-Legged Stool

Have a look at my recent post on the Craftsy woodworking blog.


Thanks to the Rhode Island School of Design Museum for permission to use the photo of Frid's three-legged stool.

Thursday, May 29, 2014

Furniture I Love: Libby Schrum Design

I found Libby Schrum’s amazing furniture as I was checking out the website for the Grovewood Gallery in Asheville, North Carolina. (I’ve never been there, but I’d love to go.) I was struck by the variety of Libby’s work and how well it is made. Her furniture is full of ideas that are fully expressed and perfectly executed. Check out her Cork Chair. The curves give it great movement, and I love the milk paint finish.


Siblings is a fun take on a standard bench. Again, great idea, great execution.


Libby studied at the Center for Furniture Craftsmanship and earned a Masters at the Rhode Island School of Design. She received the 2010 John D. Mineck Furniture Fellowship, which is given to individuals “who represent a great new talent and demonstrate dedication to the craft of furniture making.” That describes her perfectly.

I appreciate Libby for helping me out on an article I wrote for the Craftsy blog on furniture glue-ups. I’m sure the glue-up for her walnut coffee table, called Theme and Variation, must have been a doozy!  


Check out her website at www.libbyschrum.com. Photos by Jim Dugan

I’m introducing a new feature here at Furnitude. I’ll do my best at the end of each post to include links or buttons to each furniture maker’s social media sites. I want to make it easy to follow them and share their work. Please help me spread the word about great furniture makers by liking, twittering, instagraming and pinteresting their work.

Libby Schrum:
Facebook

Monday, May 12, 2014

Zhang Zhoujie Stainless Steel Furniture

Just when I think I’ve seen everything in furniture, something like this comes up. The designer, Zhang Zhoujie, makes furniture out of stainless steel (and Titanium) but it looks like cut diamonds. This chair is officially the coolest thing I’ve ever seen. It looks like a CAD drawing come to life. It looks like it was designed by the Terminator.
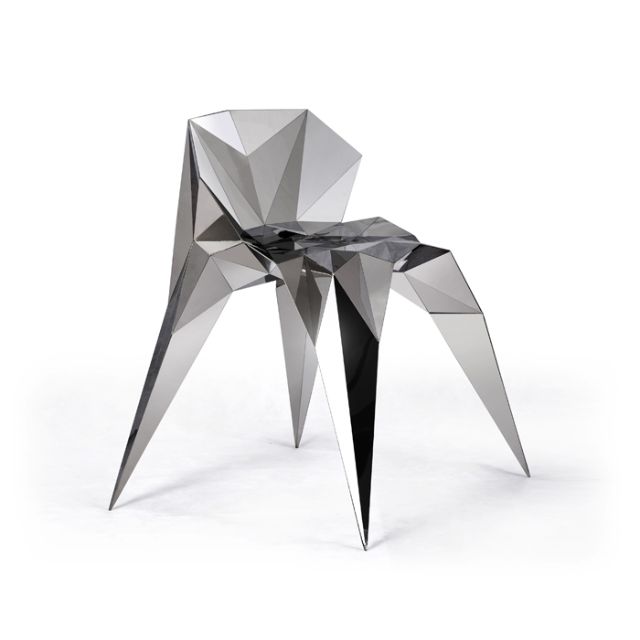
Although this furniture isn’t wood, it has a kind of organic nature to it. To achieve these shapes and contours, he uses randomness in the form of artificial intelligence. Read about his design philosophy and methods here. At 28, he was recently named Young Designer of the Year at the Elle Decor International Design Awards. Check out the video to see how he works:


Zhang Zhoujie Digital Lab from Zhang Zhoujie on Vimeo.


Wednesday, April 30, 2014

Craftsy Post: Strategic Sanding

Here is my second post on the Craftsy woodworking blog:  http://www.craftsy.com/blog/2014/04/how-to-properly-sand-wood/


It's a real challenge to make sanding interesting, but that's what I tried to do. Would love to hear any feedback.

Wednesday, April 23, 2014

First Craftsy Post: Woodworking Safety Tips


Have a look at my first post on the Craftsy woodworking blog:  
http://www.craftsy.com/blog/2014/04/woodworking-safety-tips/


The great Wilbur Pan, of Giant Cypress fame, is also on board. I think some cool woodworking things are coming up at Craftsy, so stay tuned.